spark manual
集群概述
本文章涉及spark安装部署,spark-sql,spark-shell,streaming等等的应用demo…saprk文章
部署过程详解
Spark布置环境中组件构成如下图所示。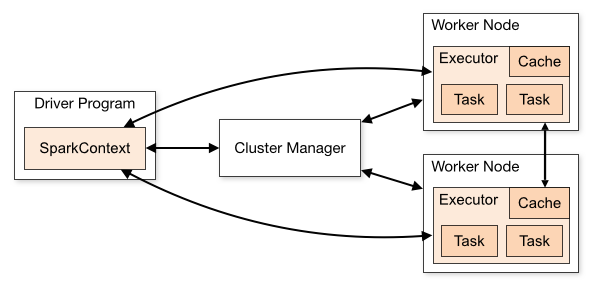
Driver Program简要来说在spark-shell中输入的wordcount语句对应于上图的Driver Program。Cluster Manager就是对应于上面提到的master,主要起到deploy management的作用Worker Node与Master相比,这是slave node。上面运行各个executor,executor可以对应于线程。executor处理两种基本的业务逻辑,一种就是driver programme,另一种就是job在提交之后拆分成各个stage,每个stage可以运行一到多个task
Notes: 在集群(cluster)方式下,Cluster Manager运行在一个jvm进程之中,而worker运行在另一个jvm进程中。在local cluster中,这些jvm进程都在同一台机器中,如果是真正的Standalone或Mesos及Yarn集群,worker与master或分布于不同的主机之上。
JOB的生成和运行
job生成的简单流程如下
- 1、首先应用程序创建SparkContext的实例,如实例为sc
- 2、利用SparkContext的实例来创建生成RDD
- 3、经过一连串的transformation操作,原始的RDD转换成为其它类型的RDD
- 4、当action作用于转换之后RDD时,会调用SparkContext的runJob方法
- 5、sc.runJob的调用是后面一连串反应的起点,关键性的跃变就发生在此处
调用路径大致如下
- 1、sc.runJob->dagScheduler.runJob->submitJob
- 2、DAGScheduler::submitJob会创建JobSummitted的event发送给内嵌类eventProcessActor
- 3、eventProcessActor在接收到JobSubmmitted之后调用processEvent处理函数
- 4、job到stage的转换,生成finalStage并提交运行,关键是调用submitStage
- 5、在submitStage中会计算stage之间的依赖关系,依赖关系分为宽依赖和窄依赖两种
- 6、如果计算中发现当前的stage没有任何依赖或者所有的依赖都已经准备完毕,则提交task
- 7、提交task是调用函数submitMissingTasks来完成
- 8、task真正运行在哪个worker上面是由TaskScheduler来管理,也就是上面的submitMissingTasks会调用TaskScheduler::submitTasks
- 9、TaskSchedulerImpl中会根据Spark的当前运行模式来创建相应的backend,如果是在单机运行则创建LocalBackend
- 10、LocalBackend收到TaskSchedulerImpl传递进来的ReceiveOffers事件
11、receiveOffers->executor.launchTask->TaskRunner.run
代码片段executor.lauchTask
def launchTask(context: ExecutorBackend, taskId: Long, serializedTask: ByteBuffer) {
val tr = new TaskRunner(context, taskId, serializedTask)
runningTasks.put(taskId, tr)
threadPool.execute(tr)
}最终的逻辑处理切切实实是发生在TaskRunner这么一个executor之内。
运算结果是包装成为MapStatus然后通过一系列的内部消息传递,反馈到DAGScheduler
编译spark
获取源码
`wget http://mirror.bit.edu.cn/apache/spark/spark-1.4.0/spark-1.4.0.tgz`
`tar -zxf spark-1.4.0.tgz`
`cd spark-1.4.0`
编译支持hive,yarn,tachyon
1、[ERROR] PermGen space -> [Help 1]
export MAVEN_OPTS="-Xmx2g -XX:MaxPermSize=512M -XX:ReservedCodeCacheSize=512m"
2、编译
mvn -Pyarn -Phive -Phive-thriftserver -Dhadoop.version=2.4.0 -DskipTests clean package
3、生成部署包
./make-distribution.sh --with-tachyon --tgz -Phive -Phive-thriftserver -Pyarn -Dhadoop.version=2.4.0
4、编译spark支持ganglia插件
https://spark.apache.org/docs/latest/monitoring.html1
2export MAVEN_OPTS="-Xmx3g -XX:MaxPermSize=1512M -XX:ReservedCodeCacheSize=1512m"
mvn clean package -DskipTests -Pyarn -Phadoop-2.4 -Dhadoop.version=2.4.0 -Phive -Phive-thriftserver -Pspark-ganglia-lgpl
[ERROR] mvn <goals> -rf :spark-mllib_2.10
参考:http://stackoverflow.com/questions/29354461/spark-1-3-0-build-failure
https://issues.apache.org/jira/browse/SPARK-6532
调试:mvn -DskipTests -X clean package,是个bug已解决!
pom.xml文件中修改
1 | <plugin> |
由于windows编译生成部署包那个脚本不能用,所以自己制作部署包!
参考官网编译后的目录来构建!
Spark Standalone Mode
配置
1、配置spark-defaults.conf
$ cat spark-defaults.conf
# Default system properties included when running spark-submit.
# This is useful for setting default environmental settings.
# Example:
# spark.master                     spark://master:7077
# spark.eventLog.enabled           true
# spark.eventLog.dir               hdfs://namenode:8021/directory
# spark.serializer                 org.apache.spark.serializer.KryoSerializer
# spark.driver.memory              5g
# spark.executor.extraJavaOptions  -XX:+PrintGCDetails -Dkey=value -Dnumbers="one two three"
spark.master            spark://server1:7077
spark.eventLog.enabled  true
spark.eventLog.dir      hdfs://mycluster/tmp/spark
spark.serializer        org.apache.spark.serializer.KryoSerializer
spark.executor.memory   8g
spark.local.dir  /data/spark/localdata
spark.driver.memory   10g
spark.history.fs.logDirectory /data/spark/local
spark.scheduler.mode  FAIR
2、配置saprk-evn.sh
$ cat spark-env.sh
export JAVA_HOME=/usr/java/jdk1.6.0_31/
export SCALA_HOME=/usr/apps/scala-2.10.4
export HIVE_HOME=/etc/hive
export HIVE_CONF_DIR=$HIVE_HOME/conf
export HADOOP_HOME=/etc/hadoop
export HADOOP_CONF_DIR=/etc/hadoop/etc

export SPARK_MASTER_IP=server1
export SPARK_MASTER_PORT=7077
export SPARK_MASTER_WEBUI_PORT=8090
export SPARK_LOCAL_DIRS=/data/spark/localdata

# - SPARK_MASTER_OPTS
export SPARK_WORKER_CORES=20
export SPARK_WORKER_MEMORY=120g
export SPARK_WORKER_PORT=8991
export SPARK_WORKER_WEBUI_PORT=8992
export SPARK_WORKER_INSTANCES=1
export SPARK_WORKER_DIR=/data/spark/workdir
export SPARK_WORKER_OPTS="-Dspark.worker.cleanup.enabled=false  -Dspark.worker.cleanup.interval=1800  -Dspark.worker.cleanup.appDataTtl=604800"
export SPARK_DAEMON_MEMORY=2048m
export SPARK_DAEMON_JAVA_OPTS="-Dspark.deploy.recoveryMode=ZOOKEEPER   -Dspark.deploy.zookeeper.url=server1:2181,server2:2181,server3:2181 -Dspark.deploy.zookeeper.dir=/spark"
export SPARK_WORKER_OPTS="-Dspark.worker.cleanup.enabled=true  -Dspark.worker.cleanup.interval=1800  -Dspark.worker.cleanup.appDataTtl=604800"

export SPARK_JAR=/usr/lib/spark/assembly/target/scala-2.10/spark-assembly-1.4.0-SNAPSHOT-hadoop2.4.0.jar
export SPARK_CLASSPATH=/usr/lib/hive/lib/mysql-connector-java.jar
export HADOOP_CONF_DIR=/usr/lib/hadoop/etc/hadoop
export SPARK_DAEMON_JAVA_OPTS=" -XX:NewRatio=1  -verbose:gc -XX:+PrintGCDetails -Xloggc:/tmp/gc.log -XX:+HeapDumpOnOutOfMemoryError -XX:HeapDumpPath=/tmp/saprk_heapdum.hprof -XX:+UseParNewGC -XX:+UseConcMarkSweepGC -XX:+UseCMSCompactAtFullCollection -XX:CMSInitiatingOccupancyFraction=60 -XX:+PrintGCTimeStamps"
export SPARK_LOG_DIR=/var/log/spark
3、配置log4j
根据各自情况配置log日志级别方便调试!
4、配置fairscheduler.xml
1 | $ cat fairscheduler.xml |
4.1 spark-sql使用队列
1 | SET spark.sql.thriftserver.scheduler.pool=test1; |
4.2 应用程序中使用队列
1 | // Assuming sc is your SparkContext variable |
spark on yarn
配置基本不变,但是无需启动spark集群,而直接依赖yarn集群!
yarn-spark-sql:
spark-sql --master yarn-client --executor-memory 2g
yarn-spark-shell:
spark-shell --master yarn-client --executor-memory 2g
1 | $ spark-sql --master yarn-client --executor-memory 2g --verbose |
使用spark
启动saprk集群:
$SPARK_HOME/sbin/start-all.sh
停止集群
$SPARK_HOME/sbin/stop-all.sh
1、saprk-sql
spark cli start
1 | $ spark-sql --master spark://server1:7077 --executor-memory 16g --total-executor-cores 200 |
start-thriftserver.sh jdbc
This script accepts all bin/spark-submit command line options, plus a –hiveconf option to specify Hive properties. You may run ./sbin/start-thriftserver.sh –help for a complete list of all available options. By default, the server listens on localhost:10000. You may override this bahaviour via either environment variables, i.e.:
export HIVE_SERVER2_THRIFT_PORT=
export HIVE_SERVER2_THRIFT_BIND_HOST=
./sbin/start-thriftserver.sh \
–master
…
or system properties:
./sbin/start-thriftserver.sh \
–hiveconf hive.server2.thrift.port=
–hiveconf hive.server2.thrift.bind.host=
–master
…
1 | $ start-thriftserver.sh spark://server1:7077 --executor-memory 16g --total-executor-cores 200 --conf spark.storage.memoryFraction=0.8 spark-internal spark.shuffle.consolidateFiles=true spark.shuffle.spill.compress=true spark.kryoserializer.buffer.mb 128 --hiveconf hive.server2.thrift.port=9981 |
spark-sql beeline
1 | $SPARK_HOME/bin/spark-sql --master spark://server1:7077 -e "show databases" |
2、使用spark-shell
这里需要注意,spark-shell必须在主节点启动,否则启动会失败!1
2
3
4
5
6
7
8
9
10
11$spark_home/bin/spark-shell --master spark://server1:7077 --executor-memory 2g --total-executor-cores 5
scala api:
val textFile = spark.textFile("hdfs://...")
val errors = textFile.filter(line => line.contains("ERROR"))
// Count all the errors
errors.count()
// Count errors mentioning MySQL
errors.filter(line => line.contains("MySQL")).count()
// Fetch the MySQL errors as an array of strings
errors.filter(line => line.contains("MySQL")).collect()
3、streaming
3.1 数据源来自网络端口
server2利用nc发送数据,这边不断生成数据,streaming不断计算1
2$ sudo nc -lk 9999
hello word
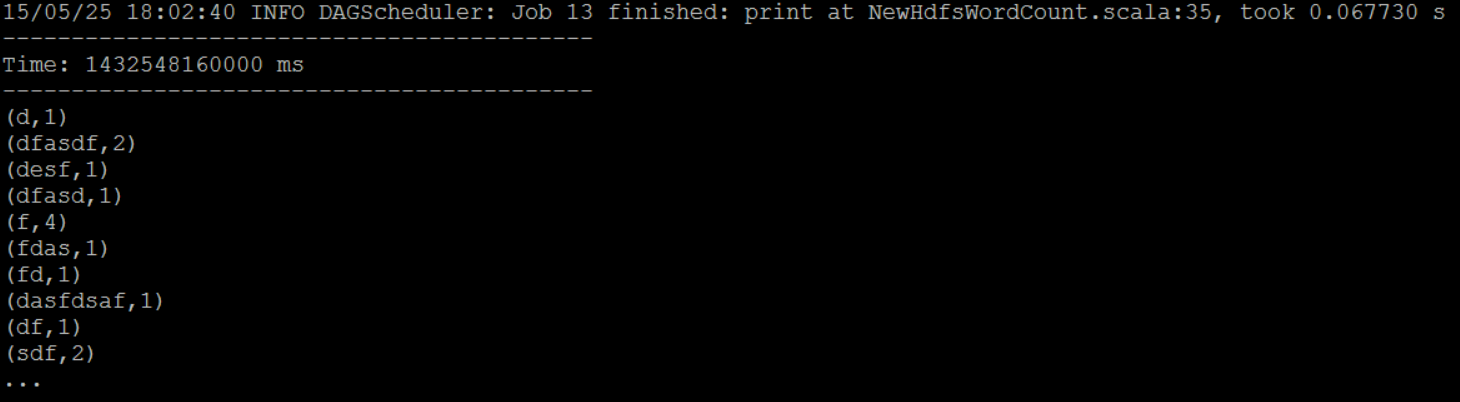
1 | # spark/bin/spark-submit --class com.sparkjvm.streaming.yarn.NewHdfsWordCount --master spark://server1:7077 ./spark-yarn-1.0-SNAPSHOT.jar server2 9999 10 |
程序1
2
3
4
5
6
7
8
9
10
11
12
13
14
15
16
17
18object NewHdfsWordCount {
def main(args: Array[String]) {
if (args.length < 3) {
System.err.println("Usage: HdfsWordCount <master> <directory> <seconds>")
System.exit(1)
}
//新建StreamingContext
val ssc = new StreamingContext(new SparkConf(), Seconds(args(2).toInt))
//创建FileInputDStream,并指向特定目录
val lines = ssc.socketTextStream(args(0), args(1).toInt, StorageLevel.MEMORY_ONLY_SER)
val words = lines.flatMap(_.split(" "))
val wordCounts = words.map(x => (x, 1)).reduceByKey(_ + _)
wordCounts.print()
ssc.start()
ssc.awaitTermination()
}
}
3.2 数据来源hdfs
1 | $ hadoop fs -cat /data/test/a |
提交程序1
spark/bin/spark-submit --class com.sparkjvm.streaming.standalone.HdfsWordCount --master spark://server1:7077 --executor-memory 10G --total-executor-cores 10 ./spark-yarn-1.0-SNAPSHOT.jar hdfs://mycluster/data/test
put数据到test目录1
2
3
4
5
6
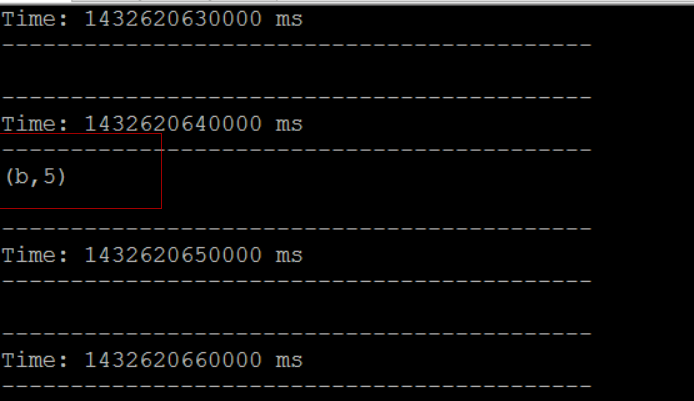
7$ hadoop fs -put b /data/test/b
$ hadoop fs -cat /data/test/b
b
b
b
b
b
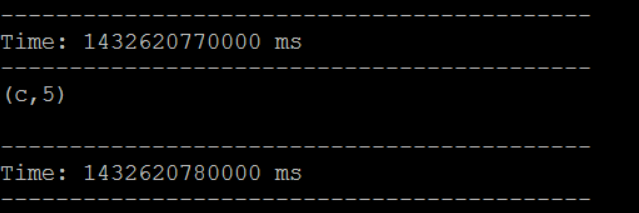
1 | $ hadoop fs -put c /data/test |
3.3 kafka+sparkstreaming
程序1
2
3
4
5
6
7
8
9
10
11
12
13
14
15
16
17
18
19
20
21
22
23
24
25
26
27
28
29
30
31
32
33
34
35
36
37
38object DirectKafkaWordCount {
def main(args: Array[String]) {
if (args.length < 2) {
System.err.println(s"""
|Usage: DirectKafkaWordCount <brokers> <topics>
| <brokers> is a list of one or more Kafka brokers
| <topics> is a list of one or more kafka topics to consume from
|
""".stripMargin)
System.exit(1)
}
StreamingExamples.setStreamingLogLevels()
val Array(brokers, topics) = args
// Create context with 2 second batch interval
val sparkConf = new SparkConf().setAppName("DirectKafkaWordCount")
val ssc = new StreamingContext(sparkConf, Seconds(2))
// Create direct kafka stream with brokers and topics
val topicsSet = topics.split(",").toSet
val kafkaParams = Map[String, String]("metadata.broker.list" -> brokers)
val messages = KafkaUtils.createDirectStream[String, String, StringDecoder, StringDecoder](
ssc, kafkaParams, topicsSet)
// Get the lines, split them into words, count the words and print
val lines = messages.map(_._2)
val words = lines.flatMap(_.split(" "))
val wordCounts = words.map(x => (x, 1L)).reduceByKey(_ + _)
wordCounts.print()
// Start the computation
ssc.start()
ssc.awaitTermination()
}
}
提交任务1
spark/bin/spark-submit --class org.sparkjvm.streaming.kafka.DirectKafkaWordCount --master spark://server1:7077 ./org.spark.code-1.0-SNAPSHOT-jar-with-dependencies.jar server1:9092,server2:9092,server3:9092,server4:9092,server5:9092,server6:9092,server7:9092,server8:9092,server9:9092,server10:9092 test
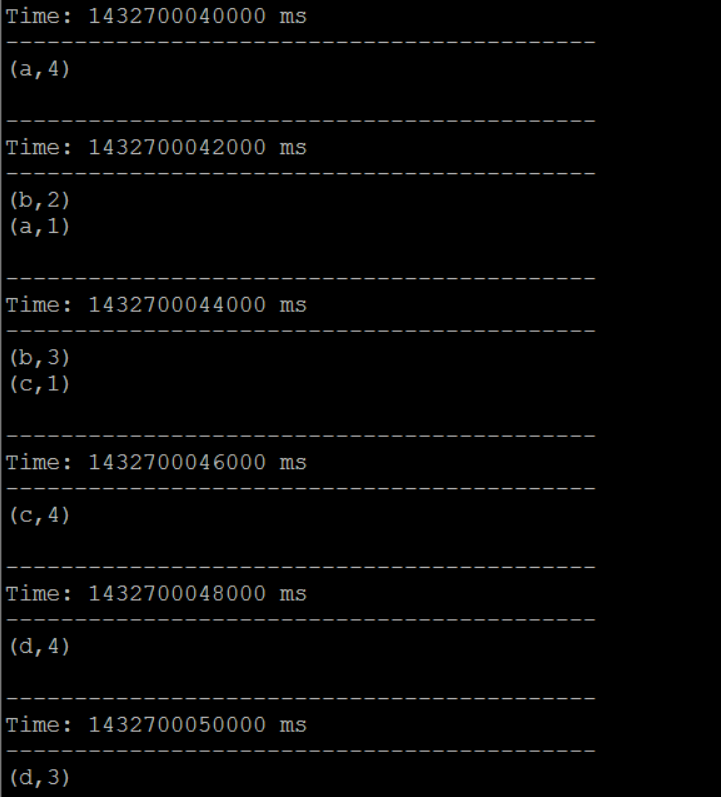
kafka发送数据到test topic1
2
3kafka/bin/kafka-console-producer.sh --broker-list server1:9092 --topic test
a b c
d e f
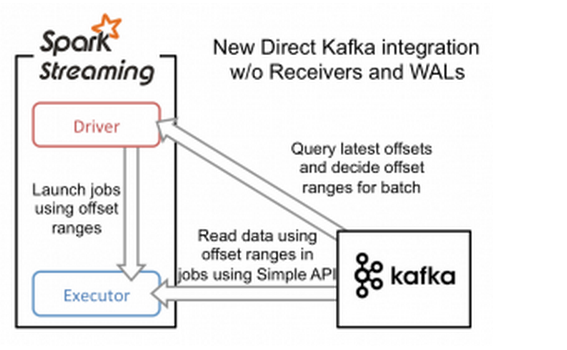
3.4 kafka+streaming more[0.13.1+]
1 | The new API is simpler to use than the previous one. |
参考:
http://spark.apache.org/docs/latest/streaming-kafka-integration.html
3.5 MLlib
https://spark.apache.org/docs/latest/mllib-guide.html
在有些情况下,你需要进行一些ETL工作,然后训练一个机器学习的模型,最后进行一些查询,如果是使用Spark,你可以在一段程序中将这三部分的逻辑完成形成一个大的有向无环图(DAG),而且Spark会对大的有向无环图进行整体优化。
例如下面的程序:1
2
3
4
5val points = sqlContext.sql( “SELECT latitude, longitude FROM historic_tweets”)
val model = KMeans.train(points, 10)
sc.twitterStream(...) .map(t => (model.closestCenter(t.location), 1)).reduceByWindow(“5s”, _ + _)
3.6 GraphX
https://spark.apache.org/docs/latest/graphx-programming-guide.html
3.7 Reducer number
In Shark, default reducer number is 1 and is controlled by the property mapred.reduce.tasks. Spark SQL deprecates this property in favor ofspark.sql.shuffle.partitions, whose default value is 200. Users may customize this property via SET:
SET spark.sql.shuffle.partitions=10;
SELECT page, count(*) c
FROM logs_last_month_cached
GROUP BY page ORDER BY c DESC LIMIT 10;
You may also put this property in hive-site.xml to override the default value.
For now, the mapred.reduce.tasks property is still recognized, and is converted to spark.sql.shuffle.partitions automatically.
3.8 spark 查看 job history 日志
(1). 修改配置文件
SPARK_HOME/conf 下:
spark-defaults.conf 增加如下内容1
2
3spark.eventLog.enabled true
spark.eventLog.dir hdfs://server01:8020/tmp/spark
spark.eventLog.compress true
spark-env.sh 增加如下内容
1 | export SPARK_HISTORY_OPTS="-Dspark.history.ui.port=18080 -Dspark.history.retainedApplications=3 -Dspark.history.fs.logDirectory=hdfs://server01:8020/tmp/spark" |
(2). 启动start-history-server.sh
SPARK_HOME/sbin 下: 执行 ./start-history-server.sh
spark job history webui: server01:18080
在spark任务运行完成之后,依然可通过web页面查看日志
(3). history server相关的配置参数描述
1 | spark.history.updateInterval |